Asian Chicken Cabbage Salad

Because of New Years this week, it has gotten me in a certain theme for my cooking. Asian flavors always tend to make it's way into a lot of my cooking anyways! And as you have noticed, a lot of my mom's recipe's make it on this blog, and this one is one of her's too! Grew up eating this salad all the time, and it's still one of my favorite salads to eat!


Asian Chicken Cabbage Salad

Serves approx. 8
Make ahead and set in fridge over night or chill for about 4 hours

Ingredients:
  • 1 Tbsp. sugar
  • 1 tsp. salt
  • 1/2 tsp. pepper
  • 1 pkg. Top Ramen Noodle seasoning
  • 1/2 cup vegetable oil
  • 3 Tbsp. rice vinegar
  • 1 tsp. sesame oil

  • 1 head of cabbage, shredded
  • 1 package of chicken Top Ramen Noodles, broken into little pieces
  • 2 cups of cooked chicken
  • 1 bunch green onions, chopped
  • Toasted sesame seeds


Directions:
  1. Whisk the first 7 ingredients in a bowl (or shake ingredients in a salad dressing bottle)
  2. Mix cabbage, dry Ramen noodles, chicken, and green onions in a big bowl.
  3. Pour the dressing over the salad and sprinkle with sesame seeds.


Looking for more of my food diary posts? Go to Instagram and look up #jessiesfooddiary

*Please don't steal my recipes :) Always link or credit my recipes if you use it, thanks!


Brown Rice Fried Rice

Growing up, my mom made us fried rice all the time, seemed like a staple meal for our family! With my mom being Japanese, we grew up eating a lot of different kinds of Japanese food, we were spoiled! That honestly made all of my siblings and I to be good eaters! I was usually picky about onions and bell peppers, but now as I'm older, I don't mind as much.

This fried rice recipe is super easy! All items were things I already had in my fridge! You only need one skillet or pan and a wooden spoon, and don't need to dirty up other dishes.

There are so many "Better Than Take-Out" fried rice recipes all over Pinterest but this recipe really IS better than take-out! It's made with brown rice and I like to garnish it with green onions on top instead of putting chopped onions inside it. I like the flavor more that way.


Brown Rice Fried Rice

serves approx. 4-6

Ingredients:
  • 1 Tbsp. sesame oil
  • 1 12 oz. bag of frozen peas and carrots
  • 3 eggs
  • 2 cup of cooked shredded or diced chicken (or shrimp)
  • 4 cups of cooked brown rice (we usually have this on hand in the fridge)
  • 1/3 cup of lite soy sauce
  • 1 bunch of green onions, minced

Directions:
  1. Heat up the sesame oil in a large skillet.
  2. Add in the frozen peas and carrots, stir for 1-2 minutes.
  3. Crack the eggs right into the skillet and stir with the veggies until cooked.
  4. Add in your chicken and brown rice, let it cook, or "warm up",  for about 4 minutes.
  5. Pour in the soy sauce and mix till it's all incorporated.
  6. Serve in a bowl and garnish with green onions.


Enjoy!

Looking for more of my food diary posts? Go to Instagram and look up #jessiesfooddiary


Roasted Brussel Sprouts and Tomatoes with Chicken Apple Sausages


Don't you love the beautiful colors of vegetables?! I thought I would test out all the hype about roasted brussel sprouts and it did not disappoint! The only time I have ever cooked brussel sprouts was when I was pregnant with Weston and I think I cooked it wrong because my house smelled like stinky feet and it made me nauseous. So I tried to stay away from it since then but I thought I would give it another try-and I love it! The roasted brussel sprouts just melted in your mouth and the juicy tomatoes paired nice together. I was just going to do the two vegetables but last minute I added some Aidell's chicken sausage and I'm so glad I did! The sweet apple flavor was a nice touch with the roasted vegetables. My oven might have roasted mine a little too long so I adjusted below.


Roasted Brussel Sprouts and Tomatoes
wit Chicken Apple Sausages

Preheat oven  to 400

Ingredients:
  • 1 lb of brussel sprouts, sliced
  • 2 cups of cherry tomatoes, sliced in half (I usually love the yellow ones because they have more flavor!)
  • 5 Aidell's Chicken Apple Sausage, sliced
  • 2 garlic cloves (minced)
  • 1 tsp dried oregano
  • 1 tsp dried parsley
  • cracked sea salt
  • pepper
  • 3 Tbsp olive oil

Directions:
  1. Place brussel sprouts and tomatoes on a foil lined baking sheet.
  2. Add garlic, oregano, parsley, salt, and pepper and then drizzle with olive oil.
  3. Place in oven for 20 minutes. 
  4. While the vegetables are roasting, pan grill your chicken sausage until heated through and a little brown on the edges.
  5. Gently mix everything into a serving dish and enjoy!

Looking for more of my food diary posts? Go to Instagram and look up #jessiesfooddiary

*Please don't steal my recipes :) Always link or credit my recipes if you use it, thanks!

Lentil Soup


Soup season is going on full force at the Boyd home! I think I've eaten soup every night this week. One of our favorites is Giada De Laurentiis' Lentil Soup. She is one of my very favorite chefs I love to follow. Like, since junior high. When other teenagers were watching sitcoms, I watched Food Network on Friday nights. I wasn't ever the normal teenager who did normal teenager things haha.

Before we got married, my husband Josh served a mission for our church for 2 years in Santa Cruz, Bolivia. In a few areas that he served, he would have the blessing of having a few lunch ladies (pencionistas) that would make the missionaries food, mainly because lunch was the most important meal of the day there. They were always simple meals like soup. He ate A LOT of soup on his mission. Almost every day. The most often soup served was lentil soup! He never knew what lentils were before his mission and he grew to really love them! When he came home and we got married, he asked for lentil soup so I searched for a good recipe! Bolivian lentil soup was basically broth, lentils, tomatoes, carrots, and sometimes a little meat, served over rice. At that point in my life, I have never cooked lentils and so I found Giada's recipe online and instantly knew it would be a good one!

Anywho, I've been making this yummy lentil soup ever since we were newlyweds and it's been a favorite during the few cold months we have here in Arizona. I love a recipe that is simple and doesn't ask for a lot of complicated ingredients. When we were first married, I was obsessed with Pinterest recipes. Although I still love finding a good Pinterest recipe, I found that so many of them called for many ingredients that would hurt our grocery budget. I hated buying that one ingredient that you would only use for that recipe.

Now in the Boyd home, I buy simple yet important ingredients that can be used for multiple recipes! For example, I stock my fridge with lots of fruits and vegetables and always have the basics like chicken, turkey meat, brown rice, wheat tortillas, lentils, black beans, cans of diced tomatoes, green chilies, chicken stock, etc. And I stock our spice cabinet too and have versatile sauces in our fridge. Things that can make a very flavorful meal with simple ingredients-and easy on the wallet! Your meals don't have to be complicated for it to taste good! This lentil soup is super easy and cheap! You can find a bag of lentils at the store for like a dollar and carrots and cans of diced tomato are super cheap too. 

I won't post the recipe myself since I shared the link but I do change a couple of things:
  • I use Italian style diced tomatoes (I love the added flavor of Italian seasonings!)
  • Even tho full sized carrots have more flavor, sometimes I use baby carrots because we always have those on hand. 
  • I opt of the celery because both Josh and I hate celery...I've always wanted to try putting a different vegetable in there tho!
  •  I usually opt of the elbow pasta too because we rarely ever have pasta in the house. Weston does not like pasta, so that's our main reason for not buying it. Plus I don't really like the carbs of pasta ;)
Not the best picture but you get the idea! *Lentils are packed with protein so this soup is a double win! I would make this a lot when I was pregnant :) Enjoy!

Looking for more of my food diary posts? Go to Instagram and look up #jessiesfooddiary

Homemade Cilantro Chicken Enchiladas with Green Sauce

I love a good chicken enchilada and this one is point on with LOTS of green sauce. Just the way I like it. A couple months ago, I posted this on Instagram/Facebook and SO many people asked for the recipe and I'm finally getting around to posting it! I've made it a couple times for family and friends and I'm proud to say, they think it's restaurant worthy! Sorry I don't have professional pictures or anything but I promise this recipe is for the books! It's a Boyd favorite.


Homemade Cilantro Chicken Enchiladas with Green Sauce

Preheat oven to 375

Spray a 9x13 glass pan

Ingredients:
Green Sauce-
  • 1 Tbsp. unsalted butter
  • 2 Tbsp. minced garlic
  • 1 Tbsp. flour
  • 1 cup chicken broth
  • Dashes of salt, pepper, and cumin (to your liking)
  • 1/3 cup chopped cilantro
  • 1 cup of medium salsa verde (my favorite is the 505 Southwestern Green Hatch Chile brand)
  • 1/2 cup of plain Greek yogurt
Enchiladas-
  • 8-12 whole wheat flour tortillas
  • About 4 cups of Shredded chicken (I like to use Costco's rotisserie chicken or just crock pot chicken)
  • Shredded Colby jack cheese (for inside and on top)
  • Optional: add avocado slices, veggies, onions, etc.

Directions:
Green Sauce-
  1. In a medium sauce pan, melt butter on medium heat. Add the minced garlic and cook for 1 minute (don't burn!)
  2. Add the flour and whisk as your pour in the chicken broth. Add in the seasonings and come to a low boil.
  3. Add the chopped cilantro, salsa verde, and the Greek yogurt. Whisk it all together.
  4. Turn off the heat and pour 3/4 cup of sauce on the prepared pan.
Enchiladas-
  1. Place about 1/2 cup of chicken in each tortilla. Add optional veggies. Sprinkle cheese.
  2. Fold in half, to close, and then roll and tuck. Do this for all the tortillas. Pour the rest of the green sauce on top of the enchiladas. Sprinkle cheese on top.
  3. Bake for 15-20 minutes.

Looking for more of my food diary posts? Go to Instagram and look up #jessiesfooddiary

*Please don't steal my recipes :) Always link or credit my recipes if you use it, thanks!

The. Best. Pumpkin Chocolate Chip Cookies

Surprise...another pumpkin AND chocolate chip recipe! I blame my big bag of chocolate chips I bought at Costco on sale. I usually make and bring these to our family Thanksgiving dinners, but I have already made this recipe 3 times this fall season! If you don't like pumpkin things, I don't care, this will be the ONE pumpkin thing you have to try! I promise, it won't disappoint :)

Every year for the big Lewis Thanksgiving dinner (Josh's side), I bring these cookies and all 5 dozen that I make get gobbled up! They love it that I bring these, especially all the little cute cousins running around.

*Update* About 4 years ago, when I originally made these cookies, I got the inspiration from this recipe! You can see it's similar (like most pumpkin cookies are) but I adapted it to my own liking. For a couple years, I couldn't remember where I hand jot this recipe, but alas here it is! Of course, they are from the days where I was obsessed with Food Network recipes, before the Pinterest Boom ;)

These delectable cookies have that perfect softness with that slight golden-brown outer edge. It's perfectly seasoned with fall spices and the chocolate compliments it! Hope you try it and share it with your family! It'll be gone within minutes!


The. Best. Pumpkin Chocolate Chip Cookies

Makes 5 dozen

Preheat your oven to 350

Ingredients:
  • 1 cup unsalted butter, softened
  • 1 cup white sugar
  • 1 cup brown sugar
  • 2 large eggs
  • 1 tsp. vanilla extract
  • 1 15 oz. can of pumpkin puree

  • 3 cups all-purpose flour
  • 2 tsp. baking soda
  • 1 1/2 tsp. baking powder
  • 1/2 tsp. salt
  • 1 tsp. cinnamon
  • 1/4 tsp. nutmeg
  • 1 tsp. pumpkin pie spice
  • 2 cups semi-sweet chocolate chips


Directions:
  1. Prepare your baking sheets by using parchment paper. My favorite are these pre-cut parchment baking sheets! They are great for an easy clean up.
  2.  Using a mixer, beat butter until smooth. Beat in white and brown sugars until light and fluffy. Beat in eggs, then mix in vanilla and pumpkin puree.
  3. In a large bowl, whisk flour, baking soda, baking powder, salt, cinnamon, nutmeg, and pumpkin pie spice. Slowly beat the flour mixture into the batter. Fold in the chocolate chips.
  4. Scoop the cookie dough by heaping tablespoons (or use a cookie scoop) onto the prepared cookie sheets.
  5. Bake for 15-20 minutes or until they are brown on the edges. Let it rest for 2 minutes before you cool on wire racks.
*When you take them off the cookie sheets, spray your spatula with cooking spray to get the cookies off the spatula easier! Sometimes cookies will stick to the spatula and break off because they are still hot. This way it can glide off without breakage!


Looking for more of my food diary posts? Go to Instagram and look up #jessiesfooddiary

*Always link or credit my recipes if you use it, thanks!

Crock Pot Salsa Chicken

Here's a quick post on one of our favorites and a staple in the Boyd home. Everyone loves a good crock pot meal right? This is for simple shredded chicken salsa recipe with a flavorful punch. All it calls for are 4 simple ingredients! Super easy. I usually make it in the beginning of the week so we have it all through out the week for easy to-go meals. Easy lunch that Josh likes to take to work.


Crock Pot Salsa Chicken

Cook on low for 6-8 hours

Ingredients:
  • 4-6 chicken breasts (I like to use the big bag of frozen chicken from Costco and they are big pieces)
  • 2 cups of Kirkland Organic Salsa
  • 2 Tbsp of Trader Joe's Hot & Sweet Mustard (my favorite mustard)
  • 2 Tbsp of brown sugar

Directions:
  1. Place chicken breasts inside crock pot.
  2. In a medium bowl, mix salsa, mustard, and brown sugar together.
  3. Pour it on top of the chicken.
  4. Cook on low for 6-8 hours.
  5. Shred the chicken and pair it with a whole wheat tortilla or brown rice and top it with a dollop of plain Greek yogurt. 
See I told you it's easy! Hope you enjoy!

Looking for more of my food diary posts? Go to Instagram and look up #jessiesfooddiary

*Please don't steal my recipes :) Always link or credit my recipes if you use it, thanks!

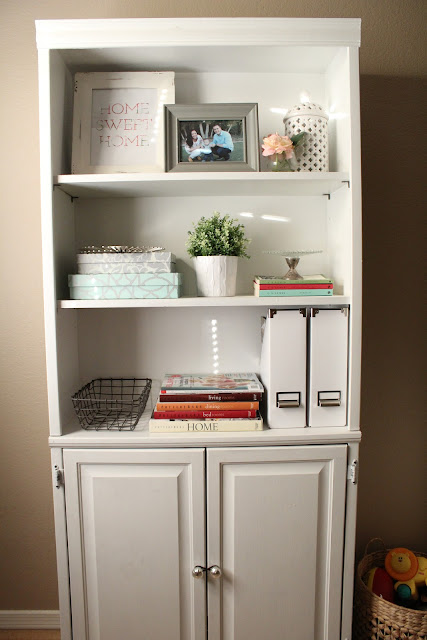
Humble Abode

Welcome to my humble abode. We live in a small 2 bedroom 2 bath townhome and let's just say I have become ever more grateful and humble through our experiences here. I will admit that most of the time, I feel like my kids are constantly on top of me and everyone is in everyone's breathing space. My husband can attest to the sounds of my occasional complaining and wishes. But I just know that one day, I'll be so grateful for these times. One day, I'll have a modest size home with fantastic decor. One day.

But for today, let me show you what you can do with a small living space like ours! I love a fresh, clean room with crisp colors. I tend to lean towards neutrals with a pop of color. When you especially have a small space like ours, a clean and light colored style is the way to go! Dark colors will only make it look smaller.

When you're still in the renting stage like us, having a book shelf like this one here is the perfect way to display some home decor! I scored this off a friend of mine for $50 and just switched out the knobs for some cute mercury glass knobs from Hobby Lobby. (Yes ours has a hair tie wrapped around it so our toddler will stop getting into it!)


I just realized our toddler yet again probably messed with our books. Oh the joys of having a toddler that is just the right height for nice things :)


Decorate with pictures of the ones you love, books, small plants, candles, and little knick knacks (like this cute little cake stand I found on a Facebook selling group!)  I like using colorful books because they really add depth and height to your shelving. Greenery or flowers really add a freshness to your home (even if they are fake!)

I've mentioned it on my Instagram before but shelving just stresses me out! I know it may sound silly, but finding the right items to pair with each other is tricky. I'm a perfectionist but having kids have really toned that down. I know nothing in your home can be perfect or stay perfect! 


Another way to fill your walls is either doing the famous gallery wall or getting these wonderful IKEA shelves to make it easy for you.


I added these cute spring pillows I scored on sale at T.J. Maxx to brighten up the couch and the room as a whole!


Here is our unfinished gallery wall. I get too stressed about it and still haven't found the right things to put together.


That "Family is forever" canvas sign is one of my favorite pieces I own. I scored it at T.J Maxx for $10!


We installed this shelf from Home Depot as our "mantle" above our unused fireplace. It's where I usually do my holiday decor as well. I love mixing silver and gold and this gold frame with one of my very favorite hymns holds dear to my heart. Josh gave this to me for Christmas last year and it's a perfect addition to our home!


And last of all, a wonderful reminder for us all. I like to put a picture of the Savior by the door. It's a notable reminder of His example before we walk out and to keep His spirit within the walls of our home.


Chocolate Pumpkin Cake with Chocolate Ganache

The weather here is finally getting exciting and bearable for the kids and I to be outside without the occasional swipe of the sweat mustache. I wait all year where I can open the windows and enjoy the fresh air that fills my home! Over here at the Boyd Home we get giddy over pumpkin everything...who doesn't? Over the years, I feel like pumpkin has become somewhat of a fad and I feel it's totally acceptable to jump on the pumpkin bandwagon. Pumpkin candles, pumpkin frozen yogurt, pumpkin lotion and soaps, pumpkin donuts...I've even seen pumpkin body spray...totally ok to smell like a pumpkin baked good in public, right?

Growing up, I was not a fan of pumpkin at. all. It's one of those things as kid that made you gag and you thought were only for adults. I think it was the fact that pumpkin baked goods had spices and all I cared about was chocolate. Well as I grew older and my taste buds became more refined, I can't get enough of pumpkin flavored things! Isn't it funny how your taste buds change over time?

My birthday falls on the time frame where it starts to get socially acceptable to bring out the pumpkins. It's like a birthday present to me. Cooler weather and pumpkins. What more can I ask for? One of my very favorite pumpkin baked goods I like to make is my mother's Chocolate Pumpkin Cake! I ask for it every year but this year I wanted to make it myself! It's the easiest  4 ingredient cake you'll ever make! Did I say 4 ingredients? Yes! It's sooo moist and chocolaty (I really had look it up to make sure it was a real word).


Chocolate Pumpkin Cake with Chocolate Ganache

Serves 8-12 people

Preheat your oven to 350

Ingredients:
Cake--
  • 1 box of Devil's Food Cake mix
  • 1 small can of pumpkin
  • 3/4 cup of water
  • 1 cup of semi-sweet chocolate chips
Ganache--
  • 1 cup of semi-sweet chocolate chips
  • 1 cup of heavy whipping cream

Directions:
  1. Simply mix together all the ingredients and pour into a prepared baking pan and bake for 20-30 mins. It depends on what pan you use. I like to use a bundt pan for this because I think it makes it look pretty and presentable. A bundt pan I found out takes more time for this cake to bake! I took the whole 30 mins.
  2. If you're using a bundt pan, let the cake cool for 10 mins in the pan before you flip it, tap, and lift the pan out. Place it on a wire rack or a cake stand to let cool even more.
  3. Prepare your ganache. Place chocolate in a medium bowl. Heat cream in a small saucepan until bubbles begin to appear around edges and then pour over the chocolate. *Watch the cream closely because if it boils too long, it'll boil out of the pan-like it did for me-oops. Let stand until chocolate melts, then whisk until smooth. Let it sit; ganache thickens as it sits but you still want it pourable. Use a gravy ladle to pour it on top of the bundt cake. Let it sit for about 15 mins before you serve. Enjoy!


*Tips for using a bundt pan: to prepare, spray the pan with cooking spray and lightly flour dust the pan and shake out the excess. Make sure all the crevices are sprayed! 

Looking for more of my food diary posts? Go to Instagram and look up #jessiesfooddiary


*Please don't steal my recipes :) Always link or credit my recipes if you use it, thanks!

General Conference Breakfast


In our church, we have a world wide conference broadcast on tv every 6 months where the leaders of the church preach, teach, and share and we stay home and watch church on tv that weekend! There is a morning and after session for both Saturday and Sunday for that weekend. We LOVE to make a special breakfast and eat it while we watch the morning session.
Over here at the Boyd home, we sure do need our chocolate fix! We get excited Conference morning to make our "healthy" Chocolate Chip Pancakes! What's great is that it only needs 3 tablespoons of sugar! But don't let the "healthy" part turn you away, it's so yummy and flavorful!


Healthy Chocolate Chip Pancakes

Makes approx. 20 4" pancakes

Preheat your griddle to 375

Ingredients:
  • 1 1/2 cups unsweetened vanilla almond milk
  • 3/4 cup plain Greek yogurt (I like using Fage Greek Yogurt)
  • 2 eggs
  • 2 tablespoons butter, melted and cooled ( you don't want it to scramble your eggs!)
  • 1/2 teaspoon vanilla extract
  • 2 cups AP flour
  • 3 tablespoons sugar
  • 2 teaspoons baking powder
  • 1 teaspoon baking soda
  • 1/2 teaspoon salt
  • 1/2 cup chocolate chips

Directions:
  1. Whisk the milk, Greek yogurt, eggs, butter, and vanilla until smooth.
  2. In a separate bowl, mix together the flour, sugar, baking powder, baking soda, and salt.
  3. Stir in the dry ingredients with the batter until it is all incorporated and smooth. If your batter is too thick, go ahead and add more almond milk to make the batter thinner.
  4. Pour 1/4 cup of batter onto the prepared griddle. Flip over when the outer edges start to form bubbles. Cook for another minute and you're done!
  5. Cook the whole batter and freeze the extra pancakes! Just put them in the toaster when you want to eat them again!


These pancakes are so fluffy and have that nice outer crisp (not soggy! yuck!). *My secret to that is I cook the pancakes on a griddle with coconut oil-not a cooking spray! Just put a teaspoon or two of coconut oil after your griddle is hot and spread it around. Apply each time you cook a batch. Makes the perfect outer surface on each pancake every time!*

I hoped you enjoyed your conference weekend as much as we did here at the Boyd home. It was all so inspiring and exactly what I've been pondering about for quite some time and it was exactly what I needed to hear!

You can watch my three favorite talks herehere, and here!


Looking for more of my food diary posts? Go to Instagram and look up #jessiesfooddiary

*Please don't steal my recipes :) Always link or credit my recipes if you use it, thanks!

#jessiesfooddiary

Welcome to my Food Diary! I have always loved cooking but honestly, it was those times spent in my own kitchen after we got married that my passion grew even more and my skills flourished more naturally. Most of my own creations are inspired from things I've tasted and love, my mother, and my passion for healthy foods-with the exceptions for cheat meals of course ;). I hope you'll be inspired by and may try a few of my own creations as well as adaptions from other recipes, Pinterest recipes I've loved (I'll always link it to my Pinterest), and the recipes shared from other foodies I admire! Happy cooking!

Looking for more of my food diary posts? Go to Instagram and look up #jessiesfooddiary

*Please don't steal my recipes :) Always link or credit my recipes if you use it, thanks!